
 |
| A welcoming entry of "all-natural" materials. |
Well I finally put my hand to creating a grapevine topiary-type tree. I have been talking about doing this for years. Originally, I wanted to create a large scale one for the interior of the home in place of a "normal" evergreen tree; perhaps about 7 foot tall. I may still do it but now know how much time will be required to create one of that magnitude. I decided to "go small" first and see if I could make it work before attempting to "upsize".
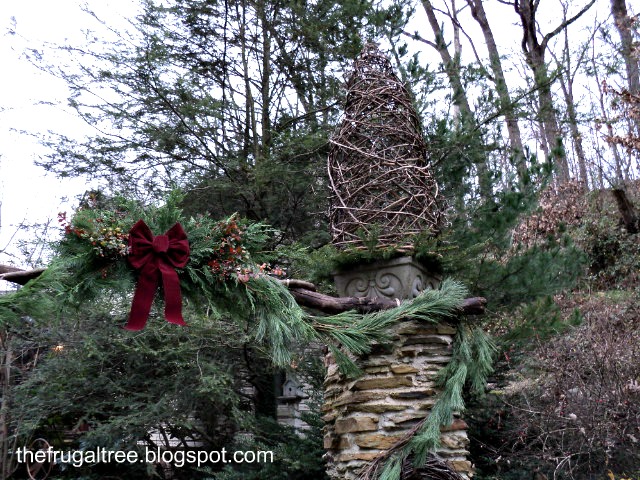 |
| Grapevine Topiary Seen Atop The Stone Column |
To make this project you will need:
2) Wire mesh (chicken wire) for a base (if you require a weighted base - optional). This can be purchased at most hardware or home improvement stores. I bought it at Ace Hardware for a prior project.
3) Wire snips/cutters and pliers.
 |
| Cages, Wire Mesh, Wire Cutters and Strewn Grapevine |
4) Paddle Wire, Floral Wire and/or Small Ty-wraps.
5) Brown or similar colored spray paint (optional).
6) Tons of grapevine. (Free from the woods or purchased in garland/spirals from online sources such as Amazon).
8) Miniature outdoor lighting (brown grapevine lighting recommended)
8) Lots of patience and perseverance!
I placed my tomato cage on top of the wire mesh and cut a square with the wire snips to fit the circumference of the cage. Once cut out, I carefully folded the corners that extended beyond the "circle" inward over top of the bottom ring of the tomato cage. I snipped the wire where necessary to make it neatly "foldable". Use your pliers to bend and press the wire inward tightly around the bottom ring of the cage and to clamp it down securely. This base is intended to weigh-down the topiary with rocks or a brick (as I used).
 |
| Getting ready to cut a square of wire for the cage's base. |
NOTE: Use caution when handling the cut ends of the mesh wire. They are sharp. Use the pliers instead to bend them into place.
 |
| The corners have been carefully folded inward over the bottom hoop of the cage. |
If you so choose, you may elect to do a quick spray paint of the cage itself to mask the silver so it blends better with the grapevine you will later be wrapping onto it.
Once dry, begin wrapping grapevine to the base. You may want to use the thicker diameter vine at the bottom and work upward with the thinner more pliable vine. You will want to connect the bottom "base" grapevine well with paddle wire (floral wire) or ty-wraps. I used paddle wire.
 |
| Thicker vine has been secured to the base and diagonal spirals are beginning to be added. |
Due to the tapered shape of the cage, you can not simply wrap the vine continually from the bottom to the top as it has a tendency to slide upward (unless you constantly want to wire it in place). Instead, you will begin to wrap the pieces upward at an angle (diagonally). Go to the bottom, attach another piece in another location and wrap upward at an angle again. You will want to begin attaching and wrapping in this manner, both clockwise and counter-clockwise, alternating every so often so that your vines begin crisscrossing over one another in an "X" shape. Soon you will no longer need to use any paddle wire or other means of attaching the vine as you will be able to weave it through itself to hold it in place.
 |
| A brick for weight is still visible within the structure. |
If you want a weighted base, you want to be sure to add a few rocks or a brick before you totally weave the form closed with vine. However, it's pretty easy to shift the vine around to create an opening to slide a weighted object inside if you forget.
 |
| Another angle |
You may elect to fully cover the form with grapevine or leave it a bit more open as I have done. If you choose the latter, you will be able to observe any lighting you place around the structure the whole way through which will give the illusion of more lights. You may want to choose brown miniature lighting as I have done so it blends in and is less noticeable during daylight hours.
I placed my completed structures on top of concrete planters to give them a decorative base. They are set atop 8 foot stone columns. At this height, the brick inside is not visible. I placed cuts of evergreen around the top of the planter before setting the topiary structure down. This helped mask any signs of the mesh wire base that may have been visible.
|
| A concrete planter is used as a pedestal for the topiary tree. |
I would estimate that each topiary took about 3 hours. I worked on them over a 2-day period. I also ran out of the free grapevine I pulled down from the trees along my road and from my own property or I would have continued adding more. All in all, I'm quite pleased with the finished result and can always add more grapevine at any time should I choose to do so.
This project cost less then $20.00 total in supplies. The biggest "cost" would be your own labor but you can't put a price on your time when you end up creating a project of which you can be thoroughly proud. In that case, it makes it ALL WORTH IT!
For more projects such as this, see my post on Grapevine Galore. I will be adding more information about this completed entry project and the all the natural materials used to create it, as well as the additional, coordinating decor for the front porch and doorway. I'm going "Natural-Minimalist" this year so please stop back for more soon!
Sharing this idea at:
The Shabby Creek Cottage - Transformation Thursday
The Shabby Nest - Frugal Friday
Really love this Xmas decorated entry way! Very creative & festive.
ReplyDeleteThanks for the great "how too" direction's,watching for more updated info!
Wow, those are incredible looking. I bet they really look nice at night.
ReplyDeleteThat looks so nice. I would use them but I don't want to make them. LOL. Can you make them for me? :-)
ReplyDeleteSimply Gorgeous.
ReplyDelete