Sunday, November 11, 2012

Numbered Wine Bottles

While browsing the newest Restoration Hardware source book, I happened upon some cool accents that I knew would be easy to replicate. These numbered bottles were apparently only used for staging as I could not find them for purchase. Since I'm a fan of upcycling wine bottles, this was right up my alley.

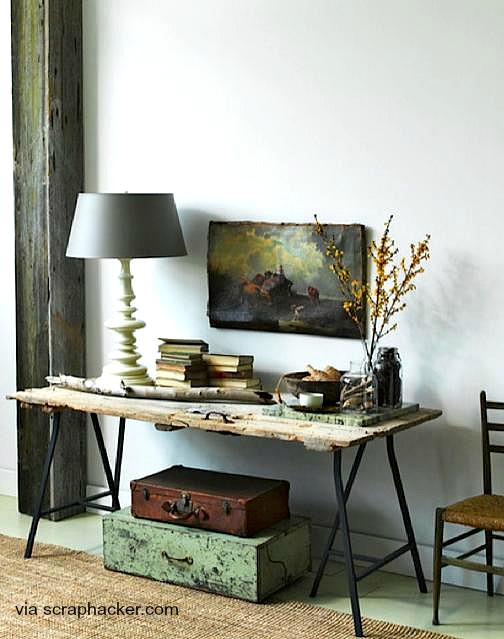
That pendant lighting ROCKS too!

It took awhile to scrounge up three clear bottles. I thought the black bottles (above) were cool, but had none on-hand. I guess I could have done a black "paint-glaze" to the interior of my bottles but thought white on clear would look classy.


First, I looked for the correct font; Boston Traffic is the trendy font used on these bottles. Just do a Google search to find a font creator. I actually printed out the numbers of my street address to give this trio of bottles a bit of meaning. After they've printed (you may have to resize them first), I cut them out with an X-acto Knife. Use much caution when dealing with these knives. For best results, place your printed-out font paper on a surface the knife can easily cut into. I typically use cardboard.

TIP: While working on your fonts, you may want to soak your wine bottles in some hot water with dish detergent. This usually will allow the labels to peel off easily. I got a few wine labels off intact and am saving them for a future project!

A damp paper stencil easily sticks to glass.

To adhere your paper letters to the bottles, simply run them under a soft stream of water until they are soaked through.  Then, lay them in place.  Use a paper towel to dab any residual water off of the glass, particularly within the area you will be painting.


I chose Martha Stewart acrylic craft paint, color summer linen with a satin finish.  Using a small yet stiff multi-purpose bristle brush with a flat head, I dabbed paint into my stencil.  I let it set for about 3 minutes and then went over the still-wet paint with a dry foam brush.  I wanted a unified-looking finish across all three bottles with minimal brush marks or stippling.

Once this was done, I removed the paper stencils while still wet.  (Place your used stencils on a papertowel to dry for future use!)  A small piece of damp paper towel helped wipe off any residue around the numbers once the stencils were removed.  Work carefully around the edges of the numbers as the paint is still wet. Once the paint is fully dry, I will remove any paint from the edges of the numbers with a slight scrape of an Xacto-knife or even a fingernail for a nice finish.

The edges of the letters will be "cleaned-up" once the paint fully cures.

I sure like the way they came out.  I was considering painting a silver or black band around the circumference of the center of the bottle with spray paint and THEN adding the number within the band.  I think that would look neat too, but . . .

. . . Sometimes Simplicity is BEST!
A great looking addition against a charcoal-black accent wall!

Until the next time, HAPPY UPCYCLING!


Sunday, September 30, 2012

Amber for Autumn Decorating

Where did the year go?  Summer is coming to a close and the colors of the new season are beginning to take over.  Blazing yellow, rusty orange, and amber-hued leaves have begun littering the property like confetti at the hand of Mother Nature.  The leaves always create a wonderful story-board of color for inspiration throughout the home.  I couldn't help but realize how perfectly my vintage amber bottles embrace the colors of Autumn.

Welcoming the new season can be as simple as pulling out some earthy, color-appropriate items and accents you already own.  Move some things around for a fresh look.  Combine like-colored items to make a statement. You don't have to spend much, if anything at all, to give your home a warm, cozy look as the crisp, cool air begins moving in.  So, here's to FALL'S harvest of color!


For the LOVE of Vintage Amber Bottles . . . 
A pair of old, amber detergent bottles on a console.

An amber bottle collection makes a grand statement.

Hand-towels and soaps introduce the colors of the season with ease.

More amber bottles and color-appropriate accents dot this bathroom's decor.


Authentically-rusted metal items fit seamlessly into the mix.


A new set of Autumn-inspired towels is quick and easy!
Seasonal dish towels for the kitchen, do the same trick (or treat)!


For more quick and easy, budget-friendly ideas,

visit my page on Fall Decorating. 

Monday, August 20, 2012

Repurposed Wrought Iron Gate

Rusty Love.

I found an old gate (actually a pair that meet in the middle - how cool!) in my woods. They were laying in the ground, half buried in earth and practically smothered under vine and vegetation. With a bit of effort I was able to free them and get a gander at their vintage beauty and aged patina.


Gate used as outdoor decor two years ago.  Oh and a repurposed chimney pot (topper) for a planter!
(That deck is now stained dark espresso.  I forgot how bad it looked.  Sheesh!)

I repurposed the gates as landscape decor for awhile and then moved them into the garage during the winter to save them further hardship from the elements.  They were rusting away like crazy.  The black finish was peeling and crumbling off from the slightest touch or movement of the gates.  They have been in-hiding (in the garage) for a year, but never-out-of-mind (my mind that is).

Rustic Window Treatment?

Yesterday I decided to clean one up enough to bring indoors.  Boy, it was a lot of work scraping off the peeling finish and rubbing like mad with a wire brush to get the loose "debris" off.  A burst of air from the leaf blower to get any remaining dust off and it was ready for a new purpose!

I love the look of RUST and that is what I was left with  . .  . some great surface pitting too!


Pitted Perfection.

I had a master plan for these gates (well, one of them at least).  I would repurpose it as a window treatment.  Now hear me out.  There is a practical reason for this.  Personally, I'm not a huge fan of draperies or window treatments, and when able, will opt for "open" windows.


A view from outside.  Ya think the birds will see it?

My large picture window was apparently loved by my feathered friends..  They loved it so much in fact that they would often fly right into it to give it a kiss (poor little guys).  No fatalities seen but a few who undoubtedly saw stars.  In an effort to warn them of the glass, I came up with this solution.  Hopefully it works.  I haven't heard any BANGS! yet today.  It will take me a while to get used to it.  I'm not warming up to it quickly as I miss the unobstructed OPEN VIEW, but at least it doesn't restrict the light too much.

So, good idea, bad idea, what do ya think?


Sunday, August 19, 2012

Repurpose a Door

There are numerous ways to repurpose a door. We've seen it done countless times. Regardless of this fact, I never grow tired of seeing them reused - even if in similar, repurposed ways.  This is probably because each door is unique and brings "new" character to any space, helping to define an intended style.


TABLES
Doors repurposed as coffeetables.

You can repurpose a door as a coffeetable which is one of my favorites!  Using old doors as any type of table top is super.  A large dining table looks especially great when crafted from a chunky old barn door. Narrower antique doors are ideal for console and accent tables. You can simply create legs with modified saw-horses for a utilitarian rustic look.

A rustic door creates a  console table top.  I love that the old hardware is intact.
This particular style table leg assembly is available at Ikea.
How cool are those cases beneath the table?

Ikea supplies numerous tresles (similar to saw-horses) and other various table legs which are simple to attach.  Those shown here are just a few of the many options available. 


WALL ART

Do you need some clever wall art? Repurpose a door as a unique focal on a wall

Use chalkboard paint on the inset panels or cover them with cork to create a
funky-chic day planner to accompany an equally chic industrial desk!

Wall art as a floating headboard.
A mirror replaces the original window glass of this vintage door.


HEADBOARDS

They look especially neat as headboards too. 
 I've seen this done in so many ways and again, it always looks cool. 

The imperfectly "matched" set of doors in this space provides a relaxed, casual look.
  

FOCAL FEATURES

Of course the simplest way to repurpose a door is to display it in a room as an architectural feature.
 Simply lean it up against a wall and enjoy!

A corner element in a rustic-chic bathroom.
Use this idea to build in a corner cupboard for extra storage in small spaces.

Stained glass, brass hardware, solid wood = Perfection!

My sister and brother-in-law decided to keep the front door from their previous residence for use at their new home.  It has been in storage in their garage for the past several years.  I recently suggested they bring it inside to enjoy until plans are made to get it fitted to their existing front entry.  It's nice to appreciate the beauty of this door once again - now flanking a chaise in their living room.


Rustic Good Looks!  A door repurposed as an architectural element.

Nothing is better than finding an old door along the side of the road, such as the case with this door.  My mother saw it out for trash and immediately called me to rescue it.  Regardless of the rainstorm occurring at the time, I jumped in my truck and went on the treasure hunt.  I wasn't disappointed.  A little mineral oil and it was good to go.  I had plans to make this a table but seeing as I haven't gotten around to that yet, I decided to display it in my family room.

It fits neatly in an odd little alcove (a trouble spot) for this room which will eventually be built-in shelves.
It provides a certain balance to the barn beam console and steamer trunk .

Did you repurpose a door in a clever way?  I'd love to hear about it!


Tuesday, August 14, 2012

Timeless Modern Style

Sounds like an oxymoron of sorts doesn't it?  Is modern decorating timeless? While many may intertwine the terms modern and contemporary (I do it myself all too often), there is a difference. Contemporary being "of the now" can eventually become outdated. At some point in "its time" however, it was all the rage.

 Modern style exhibits certain characteristics that, well, never go-out-of-style. Clean, linear pieces, reflective surfaces, monochromatic color schemes and simplistic styling keep modern spaces looking up-to-date for years and years . . .  perhaps forever.


 Case in point, the "contemporary" home on the set of Sleeping With the Enemy staring Julia Roberts (1991).  Some classify the home as contemporary but I'd call it modern personally.  This movie was on today, and although I've been in love with the home (at least the interior) since I was 18 years old, I really began noticing the perfection of modern styling in this home.  The set is practically timeless and lives up to today's standards in many respects.

Brushed-aluminum range hood, horizontal door pulls and simple styling.

I was somewhat amazed to see horizontally placed hardware (door pulls) on kitchen cabinets, glass vessel sinks in the bathroom, and what appeared to be a black shag leather rug in the living room.  Of course modern furniture always looks "modern" and you can't go wrong with black shiny stuff!  It was the smaller details however, such as those aforementioned that really struck me as "in vogue" now - 21 years later.

Modern good-looks!  Black, chrome, glass and sculptural elements - how can you go wrong?
Perhaps a bit too stark and cold for some, but ever so "COOL" nonetheless!

Does this mean those items and styles have now fallen into the "contemporary category" and will eventually fall victim to an out-dated look?  I certainly hope not.  But for now, I'm ready to throw some horizontal pulls on my cabinet door fronts and get myself a dark-colored "contemporary" shag rug for my family room!


Saturday, August 11, 2012

Upcycled Candle Jars

I've been Upcycling Candle Jars for some time now. In fact, empty candle jars are one of my favorite things to upcycle. It's amazing how easy it is to transform them into mini works-of-art if you will.

Each one seems to take on it's own personality and direction in no time. Even using the same supplies and switching-it-up a bit produces cool, new results.


My latest upcycled candle jar creation


This upcycled candle jar illuminates with lantern-like qualities due to the tissue paper wrap.  Turquoise elements provide a vibrant color and makes me think of going to the beach or walking along the shoreline.

As I was writing the main page for this project, I was thinking of how the white tissue paper base would create a perfect backdrop for Holiday-styled "lanterns" too.  With just a few minor changes in detailing, I could see these twinkling around the home during the holiday season.  Gosh, that's right around the corner! 


Here are a few others I've created along the way.  

Craft Paper and Rubber Stamp Upcycled Candle Jar

Burlap Wrapped and Metal Spring Elements Upcycled Candle Jar

I actually use tea-lights in all of them as they are mess-free and safer for these "adorned" containers.

Read the full tutorial on the beachy turquoise-lantern jar (shown at top) 
by visiting my page on Upcycled Candle Jars.

I provide a few tips for getting those used candle jars cleaned out and ready for upcycling!


Wednesday, August 8, 2012

Upcycled Tin Cans

About a year ago, I began upcycling tin cans - particularly soup cans for decorative purposes. I made a few Autumn-themed candle pedestals but more recently began experimenting with stacking them to create varying heights.


I like the shape and the ribbing of the metal which provides instant modern flavor. Of course painting them black and white doesn't hurt either.  They even look great unpainted and grouped together.  I think I am going to try weathering a set of them next.  A surface-rust patina would look really cool and make them appear a bit more industrial.


Of course stacking tin cans in this fashion has me thinking up other crazy projects like creating legs for tables or building them into a small accent table or stool.  Hmmm . . .  perhaps that is the next level of experimentation for my upcycled tin can collection.  For now, I'm digging my candle pedestals (a.k.a. my tin can decor) big time.


Visit my page on Upcycled Tin Cans for the tutorial and to learn more about this project!


Wednesday, July 25, 2012

Vintage Book Press Alternative

Vintage tools are just plain cool. They emit tons of character and history, and somehow fit seamlessly into numerous decorating styles such as modern, industrial, vintage and rustic alike.  In this instance, the vintage Cast Iron Book Press is the topic of envy.


Restoration Hardware made them quite popular a few years ago and their appeal caught on and is still growing. I've seen numerous design blogs since then displaying them with confidence.  Of course, since first seeing one, I've been fascinated with their strong presence, chunky stance and vintage good-looks!

Displayed on a coffee-table

Book Presses can be a bit pricey (even the replicas), but with a little luck, another vintage tool may present itself as a worthy alternative - - - A Vintage Pipe Cutting Clamp.

A small, vintage glass bottle seems a trusty accompaniment to this massive tool.

Yes, a few months ago, I was wandering around a small-town flea market and happened upon this contraption.  I of course did not know what the heck it was at the time, but knew in my heart it would provide the same, unique look I desired of the book press.  How much?  Ummm, I figured I'd pay up to $30.00 for the piece but was stunned when the owner said "ten bucks".  I thought I'd drop my wallet in a fumbling frenzy to get my money out - - - convinced someone lingering nearby overhead the price of my soon-to-be new treasure and would jump in with a higher offer!  After handing him the money, I then inquired as to what it was.  He probably thought I was a loon (buying something without knowing what it was).  He was probably eager to NOT have to carry the beast back to his vehicle if it failed to sell.  It sure was a heavy purchase.

Appropriately placed atop a Restoration Hardware Catalog

I got it home, cleaned it up a bit with some wire brushes and WD-40 on a rag.  I think it cleaned up quite nicely and it looks perfect perched atop a pile of books.  The coffee-table is bearing the weight of the focal item well - thank goodness!

Other vintage tools and metal accents create balance and harmony

Upon writing this post (which I've been wanting to do for some time now to gloat about my find), I decided to do a little searching online.  I found one on Craigslist doing a Google search for "vintage pipe cutting clamp" as shown below.


Listed on the Parsippany, NJ Craigslist for $150.00 for any interested local shoppers.
Wow, I sure got a bargain in paying $10.00 for mine!


Craft-paper wrapped books, another Restoration Hardware- inspired idea.


I love the massive crank-handle at the top

If the alternative (pipe cutting clamp) isn't your thing, Restoration Hardware still carries their replica cast iron book press and amazingly enough, I found a thriftier version at Amazon as shown below for about 1/2 the cost!


So, if you love the ruggedness of hefty cast iron and the appeal of antique tools, consider a vintage book press or a vintage pipe cutting clamp.  You won't be disappointed! 

Sharing this at:
Restore Interiors - Restored It Wednesday
Very Merry Vintage Style
Someday Crafts - Whatever Goes Wednesday
Savvy Southern Style - Wow Us Wednesday
The Brambleberry Cottage - Time Travel Thursday
The Shabby Creek Cottage - Transformation Thursday
House of Hepworths - Hookin Up with HOH

Sunday, July 22, 2012

Gold to OLD Paint Project on Pottery

So I guess this was a case of Out with the "GOLD" in with the "New" (or in this case) 
"in with the OLD".  A little old world styling that is.  


I first have to give props to Rosemary at Villabarnes as she is the master of this process. Over a year ago, I stumbled across her blog when starting my own and saw some of her work. She shared some of the supplies and  processes she used, and a year or so later, I FINALLY decided to give it a whirl. Seeing as I had all the necessary supplies on hand, all I needed was an item to rework.


Old School, "Gold" School

Sure enough, lingering back in my storage closet of "decor-gone-by", was a ceramic pottery piece with a shiny, metallic-gold fleur-de-lis. This piece had its time and day, and for many, the gold may not be an issue. Heck, I bought it and used it like that for years. I had lots of gold accents at one point. Shocking right? Of course, like 70's plaid sofas, some things go out-of-style.

I knew it would stay hidden indefinitely in its current state, but maybe switching-it-up a bit would offer new appeal.  The transformation wasn't difficult at all, just a few steps and a few supplies and VIOLA! - A New "OLD" Look!

First, I lightly sanded the metallic gold paint with fine sandpaper.  In some areas I went all the way through, in others I left hints of the base gold but tried to remove all the metallic in the paint finish (or at least dull the finish).

After a little sanding with fine-grit sandpaper

Next, I created a charcoal-color paint with a bit of acrylic black and mixing white I had on hand.  Surely, there are better craft paints for use on pottery but I used what was on-hand.

With a small, flat-tipped brush, I carefully applied the paint around the edge of the fleur-de-lis and filled it in.  To hide brushstrokes, I lightly stippled the paint (or dabbed it) here and there as necessary.  This slight texturing, along with the sandpaper strokes and paint layers & finishes beneath, create the perfect "base" (if you will) for the final step.

I somehow forgot to take a picture of this step, but  imagine a charcoal fleur-de-lis at this point. 

After the paint dried, I added some gesso medium with a slightly larger brush.  I pretty much covered the entire fleur-de-lis and then went back over it (it dries fairly quickly) with a soft cotton rag, wiping or buffing some of the gesso back off.


After applying gesso.
Note how the texture becomes quite pronounced at this stage.

You can keep working this step over and over to achieve the look you want.  If you wipe too much off, apply a bit more gesso and begin wiping it off again.  Buff to blend the finish to the desired look.


After lightly buffing the surface with a soft rag to remove excess gesso


Here are the supplies I used.  This project took about an hour so it's a quick redo for anyone!

*Addendum - The entire piece was covered with a Clear Acrylic Sealer in Matte

Sandpaper, brush, paint, gesso and a "rework item"


HAVE FUN!


Sharing this at:
Nifty Thrifty Things - Nifty Thrifty Sunday
Keeping It Simple - Motivate Me Monday
Boogieboard Cottage - Masterpiece Monday
Sumo's Sweet Stuff - Market Yourself Monday
Coastal Charm - Nifty Thrifty Tuesday
Related Posts Plugin for WordPress, Blogger...