Showing posts with label Outdoor Decor. Show all posts

Monday, August 20, 2012

Repurposed Wrought Iron Gate

Rusty Love.

I found an old gate (actually a pair that meet in the middle - how cool!) in my woods. They were laying in the ground, half buried in earth and practically smothered under vine and vegetation. With a bit of effort I was able to free them and get a gander at their vintage beauty and aged patina.


Gate used as outdoor decor two years ago.  Oh and a repurposed chimney pot (topper) for a planter!
(That deck is now stained dark espresso.  I forgot how bad it looked.  Sheesh!)

I repurposed the gates as landscape decor for awhile and then moved them into the garage during the winter to save them further hardship from the elements.  They were rusting away like crazy.  The black finish was peeling and crumbling off from the slightest touch or movement of the gates.  They have been in-hiding (in the garage) for a year, but never-out-of-mind (my mind that is).

Rustic Window Treatment?

Yesterday I decided to clean one up enough to bring indoors.  Boy, it was a lot of work scraping off the peeling finish and rubbing like mad with a wire brush to get the loose "debris" off.  A burst of air from the leaf blower to get any remaining dust off and it was ready for a new purpose!

I love the look of RUST and that is what I was left with  . .  . some great surface pitting too!


Pitted Perfection.

I had a master plan for these gates (well, one of them at least).  I would repurpose it as a window treatment.  Now hear me out.  There is a practical reason for this.  Personally, I'm not a huge fan of draperies or window treatments, and when able, will opt for "open" windows.


A view from outside.  Ya think the birds will see it?

My large picture window was apparently loved by my feathered friends..  They loved it so much in fact that they would often fly right into it to give it a kiss (poor little guys).  No fatalities seen but a few who undoubtedly saw stars.  In an effort to warn them of the glass, I came up with this solution.  Hopefully it works.  I haven't heard any BANGS! yet today.  It will take me a while to get used to it.  I'm not warming up to it quickly as I miss the unobstructed OPEN VIEW, but at least it doesn't restrict the light too much.

So, good idea, bad idea, what do ya think?


Monday, March 19, 2012

Free Outdoor Decor

I love cool and trendy outdoor decor as much as the next person and will be sharing some of my prior purchases and finds in an upcoming post. However, yard and garden decor can get a bit pricey and too much of it can make your property go from classy to trashy (O.K. that's harsh but it rhymes!)

Try to go frugal and introduce some free "decor" to your yard. Old, rusty elements of some sort make unique, sculptural displays. They also tend to coordinate seamlessly with natural surroundings. See what items people are throwing away. You may be able to repurpose them.

Shapely branches, limbs, tree roots and tree bark add a nice, organic touch to your landscaping. A grouping of rocks also adds interest and demands attention among any store bought elements you may elect to add. Creating vignettes outdoors isn't much different than indoors. You just have a bit more space to play with. Thoughtful groupings of elements will create a bigger impact than spacing things separately here and there. So, grab a neat branch or two, a few rocks and place them as a back drop or accompaniment to that mosaic snail or turtle sculpture.

Reclaimed Rusty Objects Become Outdoor Decor

Old rusty metal hoops (at right) along with a paint can make a unique statement.
Random sections of old stove pipe are grouped together (left).


The stove pipe collar collection.  Industrial-organic chic?

Numerous sized paint and coffee cans create a tower of rusty coolness.

A large barrel will later become a great base for a large potted plant or perhaps a bar height table.

A unified look of common elements.

Old hollowed and dried branches group nicely.  A repurposed stair rail post is topped with a
carved dragonfly from a craft show I attended numerous years ago.

A lot of free elements from trees are seen here.
Bark, branches, root and log sections  provide form and function.

Bark adds interest and helps keep mulch in place on steep landscaped areas.

An interesting, inverted tree root is joined by a couple of varying-style rocks to create this focal point.


Sharing this at:

Monday
Sumo's Sweet Stuff - Market Yourself Monday
Keeping It Simple - Motivate Me Monday

Tuesday
Coastal Charm - Nifty Thrifty Tuesday

Wednesday, March 14, 2012

Chippy Paint Rustic Shelf

As you may recall, my last adventure yielded some old, skid wood which I salvaged and turned into a rustic box. What I didn't tell you is that I also found some "authentic", chippy-paint, wood planks.   I left them there and returned a few days later to stake my claim!  After three treks back and forth through the woods, all the planks were home. What a fun work-out on a sunny and warm Spring-like day!

Here are "the goods" once I removed the numerous 3 1/2" nails and cut-off any bad end sections. At least some of the ends with nail holes were in good condition . . . (I love the vacant nail holes left in the wood for extra character.)


A bonus was that one of the planks had an old, loose (and rusted in place) latching hardware fixture. I knew I wanted to showcase that element on the completed piece.


The show-cased hardware on the finished shelf unit.

Well, here it is. Not too bad for a very "un-carpenterish" guy like myself  (" . . . Don't you remember you told me you loved me baby")


The front "apron" piece extends beyond the overall width (read more below).


Just some quick stats:

I cut (4) horizontal, shelf pieces at 3 feet and (4) vertical, side pieces at 4 feet. I created my horizontal shelves first by laying two of the 3 feet sections side by side (to add depth to the shelf) and connected or braced them together with scrap pieces of wood about 3 inches in from either end.

I did this similarly for all "sections" I created and then merely attached them together. Yes, I say merely as though it was breeze but this project took me a good four hours to do. (Pathetic, I know . . . and the carpenters on HGTV can case 8 windows, build a custom, built-in shelving unit and cut floor trim molding in a 1/2 hour show!  I'm so envious of their skills!!!)

OK, Back to attaching them. Where the sides attach to the top I used both "L" shaped brackets and corner blocks of wood. I screwed through the corner block into the top and into the sides. For the lower shelf, I again used blocks of wood which are simply screwed into the sides. These shelves simply rest on the blocks and are removable.

The wood plank with the hardware was used as an apron piece, spanning the front, top shelf. I elected to leave this one piece of wood longer than the overall width of the shelf as both ends had such great character I didn't want to lose with a clean saw-cut.  This extending piece also hides the other clean saw-cuts of the other pieces and where they connect.

Oh . . . and I added a "V" notch to the bottom of the side pieces with a jigsaw to create "legs".


Here it is staged at the front entry.

A simple mix of items with a bit of rustic charm.
Don't you just love that chippy, white paint?!

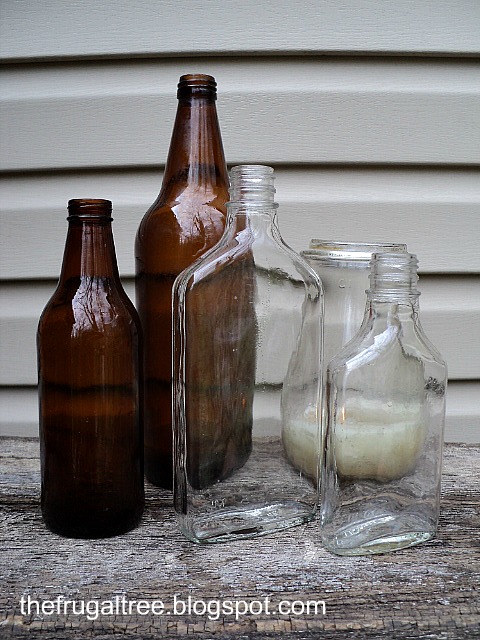
Old bottles I found while "good-deed" cleaning my road.

Old watering cans are just too cool!

A shabby lantern made from left-over. miscellaneous materials.


An iron doormat borrowed from my mother for one of my holiday displays.
Umm, maybe I can keep it awhile longer?  

The corner displaying my upcycled chimney pot with cool, twisty branches and filled with stones.

I sorta want to seal the shelf from the elements but don't want to change its appearance. Any suggestions on a good product to use? I have an oil-penetrating, clear-coat, deck sealer which I applied to the underside of one of the shelves but it made the wood darker.  I prefer the dry, weathered and faded look of the wood and don't want to lose that (too much). If I can't figure something out, this piece will be making its way indoors as a hallway console table. I really like it outside though. Thoughts?


Sharing this at:


Wednesday
Very Merry Vintage Style - Share the Love Wednesday
Restore Interiors - Restored It Wednesday
Primitive & Proper - Piece of Work Wednesday
Someday Crafts - Whatever Goes Wednesday
Savvy Southern Style - Wow Us Wednesday
Ginger Snap Crafts - Wow Me Wednesday


Thursday
The Brambleberry Cottage - Time Travel Thursday
The Shabby Creek Cottage - Transformation Thursday
Somewhat Simple - Strut Your Stuff Thursday
House of Hepworths - Hookin Up With HOH Thursdays


Friday
Happy Hour Projects - Freestyle Friday
Common Ground - Vintage Inspiration
At The Picket Fence - Inspiration Friday
The Shabby Nest - Frugal Friday
REDOUX - Friday Link Up Party
The Charm of Home - Home Sweet Home
Chic on a Shoestring Decorating - Flaunt it Friday

Saturday
Funky Junk Interiors - Sat Nite Special
Be Different, Act Normal - Show and Tell Saturday
Tatertots & Jello - Weekend Wrap Up Party

Monday, December 5, 2011

Outdoor Holiday Decor Continued

Well, I know at some point back in Autumn when I created my "porch art" for my front entry I mentioned I would keep it up until the holidays.  My set of three Alpine artificial trees typically are placed in this location. However I really like the look of this display and once I began adding a bit of greenery to it (just to experiment), I knew it was a keeper.  Besides, it's nice to change things up a bit each year.

My grapevine branch and stone art gets a holiday makeover with the addition of a huge bundle of woven grapevine at the base (to replace the "wreath of leaves") and fresh clippings of Leyland Cypress and various other Pines.  Some miniature white lights were also added for nighttime ambiance and shimmer.


I enjoy using free items from nature when decorating, especially during this season.  It just seems so fitting to combine the colors of brown grapevine and the bright greens of pine with clipping of other shrubs with red/orange hued leaves or berries.

Some leftover pieces of thick grapevine were cut into "log-like" piece, tied up with some twine and placed upon a green leafy bed of Leyland Cypress.  I really like the soft, webbed feature of the Cypress as an alternative to Pine "needles".


I was trying to come up with a solution for a "trouble spot" on my porch . . . the outlet.  I have an outdoor lighting timer and numerous plugs running into this outlet in a rather visible spot.  Throughout the year I have an inverted planter over the mess of cords and timers.  This of course is easily hidden with lots of planters during the warmer months.  In the Winter, I have to get more creative.  I wanted to place greens on top of the inverted planter but in what?  I didn't want it to look too odd or intentional.  I was looking for an old rusty bucket to fill with greens and set on top but alas I have none (note to self, "look for old rusty pails at the antique shop").  I stopped by the local flea market looking for solutions and saw an old plant hanger there (the kind you place coco-shell liners in for hanging baskets.)  Heck, I have one of those at home.  I left without that one and pulled mine out of storage, still with it's coco-shell and leftover dirt within.  I would have liked it to be a bit larger but it was adequate for its purpose or should I say, its REPURPOSE!

A repurposed hanging basket filled with various pine greenery, pine cones and bundles of tied up twigs.
Free outdoor decor!


The full ensemble of natural, free decor.  A burgundy ribbon adds just enough color to set it off and tie in with the rest of the focal areas around the property.  An old wrought iron entry mat adds some additional detail, interest and helps mask the inverted planter a bit more.

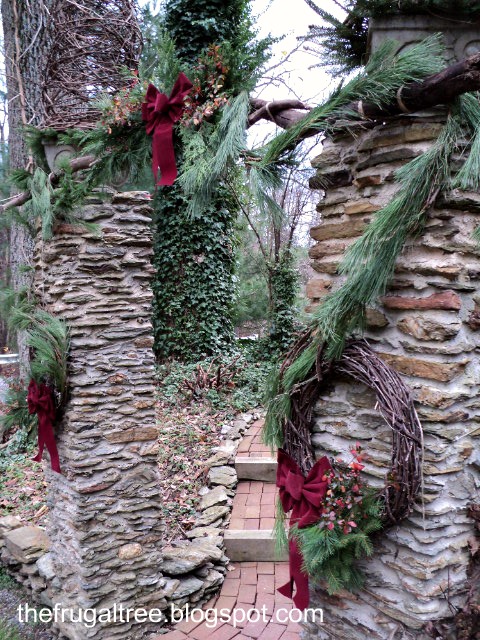
Well I promised you I would speak about the items used to create the front entry seen in the DIY Topiary Tree Project post.

All free and all-natural decor includes tree branches to span the top of the stone columns.   White pine garland, grapevine wreaths, cuttings of various pines and cypress around my property for the green, cuttings of Azalea  and Barberry for colorful leaves and stems with red berries.  Jute twine for tying it all up.  I really love the outcome this year.  The best yet!

Hopefully you are all having much success with your own decorating.  I really did some neat stuff this year indoors too so please stop back soon to check out my freely-made and "whimsily-created" weeping grapevine tree (in lieu of the typical evergreen style Christmas/Holiday tree).


Sharing this at:
The House in the Roses

Saturday, November 5, 2011

Free Front Porch Art

The October snow storm created a mess around the property, but sometimes beauty can be made from wreckage. While cleaning up one of my fallen Mulberry trees, I saved numerous branches that were entwined with grapevine. This tree was just embedded with the vine; more than met the eye until the poor thing fell and had to be removed. Besides keeping some unique branches, many sections of large grapevine were saved and have already been meshed or braided to create an ornate entry arch (stay tuned for pics!)

I was trying to determine where to place my unique branches and also HOW to display them. It hit me all of a sudden to REUSE the REPURPOSED chimney toppers (pots) that I had used this Summer as decorative planters on my back deck. I put all of the outdoor stuff away a week or so back and had the chimney pots tucked away for Winter. I pulled one back out and used it as the base for the branches. I placed unique rocks and stones within the pot to support the branches. Viola! Instant FREE Art. It looks a bit like a modern art installation, yet keeping with the organic vibe I prefer. Various leaves, already gathered in the corner and strewn upon the porch were simply picked up and placed around the base for an Autumn touch.

Hmmmm, I'm liking this look so much I'm wondering if I'll replace it in a month with the lit evergreen trees typically displayed for the upcoming Holiday season.  It may have to become an indoor installation!


Update: The evergreens trees typically placed here, did not make an appearance during the 2011 holiday season. I liked the chimney pot so much I added a little holiday cheer to the ensemble.


Sharing this idea at:


Funky Junk Interiors - Saturday Nite Special

Featured On The Crafty NestThe Shabby Nest

Monday, October 17, 2011

Inverted Tree Trunk Roots Display Pumpkins

I was trying to come up with a different way to display some pumpkins at my front entry.  I had done pumpkins on straw bales a few times before and toyed with placing a bunch of them inside large tin buckets (with some drilled drain holes of course).  I also inverted the buckets to place some on top and some around the base.  The look of the silver metal with the pumpkin colors was fine but I sort of wanted a more organic look.

While glancing around my property, I noticed one of the dead tree trunks I had previously dug out of the ground in the Spring and had placed strategically in a landscape bed as a decorative element.  I immediately got the idea to use the crooks of the roots to cradle the pumpkins.  Luckily for me I have two of these trunks/roots which I dug up.  Who knew they would become multipurpose?  I snatched that one from another landscaped area and messed around with their orientation until I had them setting just right to display the pumpkins.  I was quite pleased with the result.  I however wish they had more vertical height to get more pumpkins setting higher.  Regardless, the look is what I was after and has garnered positive comments by visitors.  Do you have any unique ideas for displaying pumpkins at your entries?    


Friday, October 14, 2011

Classy Pumpkin Ideas

Perhaps Jack-O-Lanterns are your style or perhaps simple, unaltered, festive pumpkins sitting down your front porch steps strikes your fancy.  Regardless of whether you go fun, fancy or somewhere in between, it's always interesting to see design ideas developed by others.  In this instance, engraving pumpkins.  Look at this incredible, yet simplistic design.  I love how the inner orange color contrasts so sharply against this pumpkin's unique, green skin!

Photo courtesy Jill Kirchner Simpson, CountryLiving.com


The idea is to match your pumpkin to your patterns and other design motifs found in your home;  in this case, the plate upon which the pumpkin sits.  I was impressed with many of the engraved/embossed pumpkins shown.  

A linoleum-cutting tool set, quoted at less than $10.00 at many art stores created this look.  Hmmmm, I'm suddenly feeling the urge to purchase a set to give my hand a try at this.  As always, use extreme caution when working with knives or any other sharp object as you design your pumpkins or carve those jack-o-lanterns!  I found this Linoleum Cutter Tool Set at Amazon for under $15.00.


Don't forget the "cutting the pumpkin open at the bottom" trick instead of creating a lid if you decide to fully clean and illuminate one of your designs.  I have never gone this route but see it as a smart option to eliminate the shrinking, "caving-in" lid that often develops.

Do you have some clever pumpkin decorating ideas of your own?  Share them!

Monday, August 22, 2011

A "Sunny" Property

While taking photos for the new green living section of the website, I realized just how many celestial sun items as have as yard decor. I thought I'd run out of "suns" for site photos but I had more than enough. Thought I'd share a few that may not make the cut but I enjoyed nonetheless.

Mid Day Sunlight On My Begonias


A celestial plaque adds interest to my fig tree planter.

A weathered and worn terra-cotta sun meshes well with a similarly weathered and worn  vintage gate.

A glow-in-the-dark plant stake absorbs and stores sunlight for later.


Thursday, August 4, 2011

REPURPOSE IT!

A planter base finds new use as an umbrella stand.
Since I love finding new ways to use old items, I thought I'd share another one of my "repurpose it" ideas.

I bought this random, cast concrete planter base from a high-end nursery years ago.  It was quite a deal because the upper portion apparently went missing or had broken.  I used it for awhile as its intended purpose but never loved the look since the replacement planter I found didn't quite match as I wanted it to.  So, I finally found a new use for it.  An umbrella base.  Yes, I didn't want one of those plain, plastic bases filled with sand that are rather dismal looking unless hidden beneath a table.  And some of the cool wrought iron bases, although heavy, are so low to the ground that they still may flip over when a strong wind gust comes along, unless supported by a table.  Since this umbrella is free standing (no added table), I needed something with a bit of heft and height (more than the flat wrought iron bases could afford).  So, "Viola", an instant umbrella base!
  
This thing is HEAVY.  To minimize the bottom of the umbrella pole from sliding around within the planter base, I took a plastic storage container (for food), about the size of a coffee can, cut a hole into its bottom the diameter of the umbrella pole and wedged it upside-down inside the bottom of the concrete base.  (whew, did you get all of that?)  The umbrella pole now passes through the planter AND a plastic inner container that is the same diameter which gives added stability and will help keep the umbrella upright during large wind gusts.  For some added support, I wedged random pieces of field stone down into the base around the pole.  This has been up since Spring and the umbrella, although typically closed during storms, has been left up a few times by accident with no issues.  

So, if you see something laying around your property not being used, imagine ways you can REPURPOSE IT to give it some new "life".
Related Posts Plugin for WordPress, Blogger...