Showing posts with label Furniture. Show all posts

Wednesday, March 14, 2012

Chippy Paint Rustic Shelf

As you may recall, my last adventure yielded some old, skid wood which I salvaged and turned into a rustic box. What I didn't tell you is that I also found some "authentic", chippy-paint, wood planks.   I left them there and returned a few days later to stake my claim!  After three treks back and forth through the woods, all the planks were home. What a fun work-out on a sunny and warm Spring-like day!

Here are "the goods" once I removed the numerous 3 1/2" nails and cut-off any bad end sections. At least some of the ends with nail holes were in good condition . . . (I love the vacant nail holes left in the wood for extra character.)


A bonus was that one of the planks had an old, loose (and rusted in place) latching hardware fixture. I knew I wanted to showcase that element on the completed piece.


The show-cased hardware on the finished shelf unit.

Well, here it is. Not too bad for a very "un-carpenterish" guy like myself  (" . . . Don't you remember you told me you loved me baby")


The front "apron" piece extends beyond the overall width (read more below).


Just some quick stats:

I cut (4) horizontal, shelf pieces at 3 feet and (4) vertical, side pieces at 4 feet. I created my horizontal shelves first by laying two of the 3 feet sections side by side (to add depth to the shelf) and connected or braced them together with scrap pieces of wood about 3 inches in from either end.

I did this similarly for all "sections" I created and then merely attached them together. Yes, I say merely as though it was breeze but this project took me a good four hours to do. (Pathetic, I know . . . and the carpenters on HGTV can case 8 windows, build a custom, built-in shelving unit and cut floor trim molding in a 1/2 hour show!  I'm so envious of their skills!!!)

OK, Back to attaching them. Where the sides attach to the top I used both "L" shaped brackets and corner blocks of wood. I screwed through the corner block into the top and into the sides. For the lower shelf, I again used blocks of wood which are simply screwed into the sides. These shelves simply rest on the blocks and are removable.

The wood plank with the hardware was used as an apron piece, spanning the front, top shelf. I elected to leave this one piece of wood longer than the overall width of the shelf as both ends had such great character I didn't want to lose with a clean saw-cut.  This extending piece also hides the other clean saw-cuts of the other pieces and where they connect.

Oh . . . and I added a "V" notch to the bottom of the side pieces with a jigsaw to create "legs".


Here it is staged at the front entry.

A simple mix of items with a bit of rustic charm.
Don't you just love that chippy, white paint?!

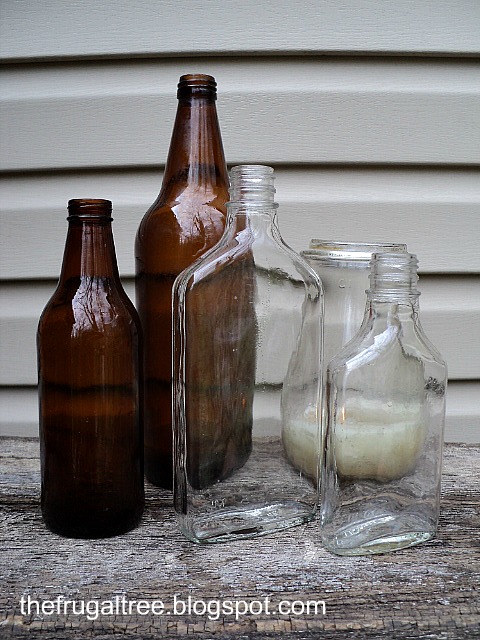
Old bottles I found while "good-deed" cleaning my road.

Old watering cans are just too cool!

A shabby lantern made from left-over. miscellaneous materials.


An iron doormat borrowed from my mother for one of my holiday displays.
Umm, maybe I can keep it awhile longer?  

The corner displaying my upcycled chimney pot with cool, twisty branches and filled with stones.

I sorta want to seal the shelf from the elements but don't want to change its appearance. Any suggestions on a good product to use? I have an oil-penetrating, clear-coat, deck sealer which I applied to the underside of one of the shelves but it made the wood darker.  I prefer the dry, weathered and faded look of the wood and don't want to lose that (too much). If I can't figure something out, this piece will be making its way indoors as a hallway console table. I really like it outside though. Thoughts?


Sharing this at:


Wednesday
Very Merry Vintage Style - Share the Love Wednesday
Restore Interiors - Restored It Wednesday
Primitive & Proper - Piece of Work Wednesday
Someday Crafts - Whatever Goes Wednesday
Savvy Southern Style - Wow Us Wednesday
Ginger Snap Crafts - Wow Me Wednesday


Thursday
The Brambleberry Cottage - Time Travel Thursday
The Shabby Creek Cottage - Transformation Thursday
Somewhat Simple - Strut Your Stuff Thursday
House of Hepworths - Hookin Up With HOH Thursdays


Friday
Happy Hour Projects - Freestyle Friday
Common Ground - Vintage Inspiration
At The Picket Fence - Inspiration Friday
The Shabby Nest - Frugal Friday
REDOUX - Friday Link Up Party
The Charm of Home - Home Sweet Home
Chic on a Shoestring Decorating - Flaunt it Friday

Saturday
Funky Junk Interiors - Sat Nite Special
Be Different, Act Normal - Show and Tell Saturday
Tatertots & Jello - Weekend Wrap Up Party

Saturday, January 28, 2012

"Musical Tables"?

Did you know that one piece of furniture can change the whole attitude and look of a room? Forget about expensive renovations and remodels. Just give it a try if one of your rooms is feeling dull and bland. Add one new element and see what happens. It just may be the quick fix you've been needing.  Such as in this office -

From IKEA sad


TO

 Rustic-RAD!  (yes, I'm coining this new design style phrase)


Now don't get me wrong. I love me some IKEA. Where else can you furnish numerous rooms with a $500.00 budget? (and I mean that in a good way.  Good products, good value!)  It is a young homeowner's dream. I was there . . .  new home, tight funds, "HELLO IKEA!" However, that look has been with me for about 12 years now. Ya think it was time for a change?

But never fret, those "once" side tables, turned coffeetable have once again "turned" . . .

. . . into a stackable storage shelf.


Yep, I kept them in the office and stuffed them into an odd nook that was somewhat troublesome to deal with. A few black storage crates tuck beneath each. Is this considered "Repurposing"?  :-)

Stay-tuned for more details about the black "crate-esque" coffeetable that turned drab to fab!


Sharing this at:
Nifty Thrifty Things - Nifty Thrifty Sunday
Be Different, Act Normal - Show and Tell Saturday

Tuesday, November 8, 2011

A Gothic Styled Chair Finds A New Home

I purchased this unique chair for a mere $12.00 from the local antique dealer during a sidewalk sale. What can I say, it "spoke to me" (hmmm, isn't that a Pier 1 phrase?)

A Great, Frugal Find


I loved it's overall utilitarian styling, chunky stance, aged wood, old leather seat and back and of course the giant tack hardware. For a guy who's a little "gaga-for-gothic", this chair won me over upon first glance. And who could turn down a deal like that? I've spent more on Happy Meals. This indeed made me happier than any McDonald's meal could!


Lots of Character


Cool Details

I wanted to retain its weathered and tattered appearance so merely applied my new, favorite product, butcher block conditioner, as noted in my reclaimed folding chairs post.


After a little TLC with the conditioner

I elected to use the product on the leather as well since the natural waxes seemed more beneficial for the aged-leather than typical, petroleum-based conditioners.


The perfect companion for my vintage, cedar chest

Do you like this style? Are you "Gaga for Gothic" or "Crazy for Chairs" (like my sister)?


Sharing this at:
Beyond The Picket Fence

The Shabby Creek Cottage - Transformation Thursday

Monday, November 7, 2011

Reclaimed, Wooden Folding Chairs . . . The Solution To My Dilemma

A few months ago I cleaned up and stained an old wooden table from my father's estate.  I had been holding on to it for a few years and finally decided to put it to use.  I had the table only; no chairs were included.  My dilemma was finding the perfect seating accompaniment for the table's style and wood color.  I kicked around the idea of benches and also saddle-seat stools.  The table has been sitting in my kitchen without chairs for a few months.  I liked the openness without chairs and knew I wanted seating that could tuck underneath without being too obtrusive in the space.

Many years back, my mother purchased some old wooden folding chairs (circa 1940s?) at a yard sale for $1.00 each.  They ended up going to my sister which she has used as accent chairs around her home in various rooms or as extra seating during holidays.  Most recently she had been using them on her front porch as decorative accents.  They have gotten a little weathered but were still in relatively good condition.  I asked her if I could have them for my table (hey, it doesn't hurt to ask!)  She said, "yes".  Yippee!  Could these be the missing pieces to my puzzle?  

The chair in the foreground has not been conditioned yet.  Note the Before and After finish.


I cleaned them up with a damp rag first, let them dry and then applied butcher block conditioner to them.  This stuff is amazing - made up of mineral oil and natural waxes, it's a safe wood conditioner with no harmful odor or toxins.  I have used it on many wooden implements and vintage wooden bowls too.  Great for those of us who like to repurpose old items!

A great product to try for conditioning old wood


The conditioner gave the chairs a deeper, more rich finish that closely resembled the wood tones of the table.

Not bad, eh?

Another angle

Unexpected, similar design elements help establish cohesion

Another great similarity between the table and the chairs is the "X" feature of the chair legs to that of the support bars at the table's base.  Talk about a cohesive element - as though the chairs and table were intended to unite as one!  Every time I walk through this area I have to marvel at the completed ensemble.  I'm quite pleased with the new seating additions and the overall look.  Hard to believe the set was essentially free (to me).  Must be Frugal Design!


Have you found some old, unique chairs that you have paired with a table.  Perhaps some mismatched ones that you have unified with spray paint?  Share your thoughts!  Craigslist can be a great source for free, "throw-aways" you can breathe new life into.

Sharing this idea at:

Monday, September 26, 2011

IKEA's New Share Space Blog

If you are an IKEA fan, they finally have a blog for fan-based interaction.  The IKEA Share Space allows you to create a profile and upload pictures of your rooms or "Spaces" as IKEA prefers to call them, and tag the IKEA items you used in your Space; a cool feature.  The only thing is the item inventory for tagging seems to be somewhat limiting; most likely only 2011-2012 catalog items appear.  I used IKEA a lot when I started out with my homes and still use most of those items and furnishings to this day.  A few pieces were sold but it's cool to be able to upload the pictures and point out your IKEA items.  Too bad they don't allow you to type in the name of the "out-dated" items in the tag field or at least note what the heck the tag is referring to.  Oh well.  Now, if we can only get Pier 1 Imports to come up with something similar. I have much more items and furnishings from them that I would gladly show off.


Hmm, lots of items made it into this office.  An Ikea couch (no longer available), a small side table at the left of the door which is actually still available (a mere 12 years later) and the ever popular LACK collection side tables which I've placed together as a coffee table (also still available).


A small office chair to the right was from IKEA (no longer available) but the 3 track ceiling light is still there!  A small, silver 6 drawer filing cabinet sets off to the right of the picture (out of view) was a more recent IKEA purchase (within the past 2 years).  If they were closer, I'd probably have more of their items in my home.

Sunday, September 25, 2011

A Kitchen Style Mix

Most who know me understand my love of mixing different styles together while still obtaining a sense of cohesion.  Well, yesterday I finally switched out my small kitchen dinette set of 14 years.  This little set is great, clean-lines, contemporary and simple.  I really liked it but kept an old farm-type table from my father's estate.  I finally got around to cleaning it up a bit (some sanding and staining) and got it moved into place yesterday.  

What a welcomed difference.  The darker color provides the contrast that was lacking with the other set which seemed to blend too well with the flooring and wainscoting.  The vintage vibe still works well with the contemporary and organic elements I love to infuse in my spaces.  Do you like the updated look?


Stay tuned as I need to figure out what type of chairs I'm going to add to this table as none were with the set. I'm currently thinking of saddle-seat stools that can push totally under to keep the open feel of the space.

 
Related Posts Plugin for WordPress, Blogger...