Sunday, April 22, 2012

Happy Earth Day 2012

Despite a hectic month of outdoor projects (still in-process and which I'll share soon), I had to take a moment to wish you ALL a Happy Earth Day 2012!


Today you can recycle a plastic bottle, conserve water usage, pick up litter and dispose of it properly, plant a sapling or visit and join the Arbor Day Foundation.  Most of these you can do daily.

Every Little Bit Helps!


Please visit my pages on Green Living for more info on how you can help OUR WORLD


Earth Day Every Day

Thanks to all who Upcycle and Repurpose and there are a lot of you!  We are making a difference just by doing what we enjoy!  Keep up the great work.  I love seeing your ideas!

Wednesday, April 4, 2012

Green For Spring

The color green always signifies Spring and its arrival. This refreshing color however seems to have a soft-spot in my heart year-round. I find it soothing, comforting, welcoming and I know I'm not alone.

Green has been a top color for designers and decorators and has been prevalent in the home decor industry for the past couple years. Its growth (haha) doesn't seem to be waning either as evidenced by this recent advertising image from Wisteria . . .

"Bugs" are still a trendy motif and theme and I'm loving it!


. . . and this catalog cover they also are promoting.
I love fern prints and am glad to see they are still in vogue.  I've been using them for many years.
White against green walls looks wonderful doesn't it?  

As more and more people become "hip to" and embrace the subtle yet crisp beauty green offers, I expect we can see it sticking around for a long time . . . and I'm FINE with that!!!

Tuesday, March 27, 2012

Pieris Japonica Shrub

Boy the weather has been wacky in Pennsylvania. Weeks of overly mild March temperatures and a mild Spring in general has everything confused. Bulbs are blooming in advance, my poor Rhododendrons are once again trying to force blooms much too early, weeds are going nuts and I had to mow my lawn already (not too happy about that one!!!)

Red tulips, out-and-about early this year.  

A red tulip on a crisp late-March morning.

Yesterday was an oddity compared to the past few weeks (or is it months) as the temps remained relatively cool (in the 50s) as they SHOULD BE for March. Great outdoor working weather in my opinion. I finally got around to doing something I've been wanting to do for about 2 years . . . transplanting my prized ornamental Pieris Japonica "Fire Mountain" shrub.


A "Fire Mountain" Japonica, newly transplanted.

I got this fella about 7 years ago in a one gallon container size for under $10.00. I believe it may have come to my knee in height at that time. I planted it in a location that I thought was perfect. We've all done that before, right? Never really taking into consideration how big it may possibly get. Well, it got big. It is now taller than me at about 6 feet and is probably near it's max in height. A perfect specimen size for an ornamental shrub.

Its previous location had it blocking visibility for access in and out of the driveway. It was also on a slight slope and loved falling forward during heavy rain or snow storms. Can't tell you how many times I frantically ran to its aid during storms or to free it from heavily weighing snow. It must be love.


Since the timing and temps were perfect yesterday I decided to "get-er-done" (finally) and am ABSOLUTELY THRILLED with the transplant (and I hope IT IS too!) I had to make room for it which entailed digging up a bizarre lone section of Privet, typically planted to produce a hedge. What's worse is this area was overgrown with trailing ivy and other "viney" culprits. The clearing of the new location took the bulk of my day for the transplant.


A much anticipated arrival . . . the Japonica in a new location where it can be better enjoyed!

The actual move was rather smooth. Japonica's have a relatively shallow root system and since mine LOVED leaning forward, it's shallow roots were already pulling upward on the backside. Guess it wanted to move to a new spot too and was helping out a bit.


The showy, fragrant flower clusters.  Look for species with pink flowers too.

Anyway, I can't say enough good things about this species and would highly recommend it. It provides year-round interest and mine has been maintenance-free. The showy cascading blooms this time of year (as evident from my photos) have a lovely fragrance that you notice just from passing by. New growth on the leaves spout at the tips in brilliant red hues giving it the trademark "FIRE" moniker and Winter buds provide interest as well. So if you are contemplating a care-free type of ornamental shrub, I highly recommend the Pieris Japonica varieties. They enjoy partial-shade to sun and moist, yet well drained soil. From what I read, they can tolerant full sun and poor soil conditions as well. I do have the recommended partial-shade to sun and moist, well-drained soil so that may be the "magic mix".

Friday, March 23, 2012

A Rustic Vignette

Well yesterday found me trekking through the woods at my parent's property in search of vintage bottles. A large tree had fallen late last year during a winter storm, uncovering a hidden trove of buried bottles in the wake of its rooted mass. I came home with over a dozen of various sized and shaped medicine and/or liquor bottles. Most still had rusty caps intact with scary substances lingering within.

Some of the reclaimed bottles, cleaned and basking in the drying sunlight.

I brought my "prized finds" home and commenced on removing cabs, dumping contents and cleaning bottles. Wow, what a chore that was. The caps so rusty, they were easily removed by pushing a nail through the center and prying off broken pieces, but getting some of the bottles cleaned-up proved problematic. Quite an ensemble of experimental cleaning products lined the garage for usage. If one failed, the next was tried. Vinegar and baking soda, rock salt, bleach with dish detergent in warm water, some super de-greaser by Prestone (automotive), Goo Gone. Eventually, all the "ickiness" was removed. A narrow paint brush and toothbrush alike helped a bit with the interiors too. Wish they were a bit more bendy at times however. They all received a second cleaning once back inside my home.

While the bottle were drying, I decided to make another rustic, decorative box from weathered pallet wood I had found. This time, a flat piece of rusty, galvanized steel was used to "badge" the front of the box. Another piece of salvaged metal formed a clamp to hold it in place. I was going to add some text to the badge but decided to leave it simple since the box could have so many varied uses. I initially thought it would be cool for displaying hand-made soaps and saying "SOAP" across the metal. Now that it's complete, I'm actually glad I chose to go "nondescript".


I decided to create a small vignette with my new box and one of my newly found and cleansed bottles. Since this bottle had a threaded top, I decided to mask them with a burlap wrap clamped in place with more scrap metal.


To finish off the look I added one of my steam-punk inspired metal orbs made from numerous broken pieces of rusty, metal springs.


I love a grouping of three and this simple ensemble just worked together so nicely. 


A trio of elements.

The completed ensemble.

Now I'm in the mood to do a few more, perhaps with a variance of included items. I'm definitely enjoying creating these rustic pallet boxes and since it's such a nice, sunny day, I can see myself outside doing a few more. Until next time . . . ENJOY!


Sharing this at:

Happy Hour Projects - Freestyle Friday
Chic on a Shoestring Decorating - Flaunt It Friday
My Uncommon Slice of Suburbia - Tuesdays Treasures
Coastal Charm - Nifty Thrifty Tuesday
At Home With K - Terrific Under Ten Tuesday
Kammy's Korner - Trash 2 Treasure Tuesday
Debbie Does Creations - Toot Your Horn Tuesday
Home Stories A2Z - Tutorials & Tips Party
Cherished Handmade Treasures - Creative Corner Hop
The Shabby Creek Cottage - Transformation Thursday
The Brambleberry Cottage - Time Travel Thursday

Tuesday, March 20, 2012

The Repurposed Fish Bowl

So, numerous years ago I acquired some glass retro fish bowls at a yard sale for super cheap. I've always had aquariums and figured they may come in handy for back-up, water changes, disciplining naughty fish . . .

Somewhere along the way, one has been misplaced. Perhaps it broke. I can't recall. The other has been sitting quietly in my basement for years in plain view, yet I never really paid it much mind . . . until recently.

A few months ago I wrote a post about simple and stylish, plain glass being used in home decor. I had purchased some cool, vintage, glass gallon jugs which prompted that post. A big trend I'm sure you've seen is repurposing those vintage jugs into table lamps or hanging pendant lights among other creative uses.

Since I was focused on clear glass, that plain fish bowl sitting in my dark basement suddenly seemed a whole lot more appealing. I figured I could use it in a new way. Albeit quite simple, if you have a spare fish bowl laying around, you have a great container for displaying items such as these natural accents - some bought, some made.


A nice mix of decorative spheres made from natural elements such as various vine, grasses and jute rope.

Thanks to Pier 1 for this excellent coffee table.  I bought it many years ago but have yet to grow tired of it.

A vintage vise (foreground) makes an excellent table accent.

Great earthy colors from both the coffee table top and the displayed accents.


Keep your eyes peeled for vintage fish bowls at yard sales.
I know I'll be looking for more now! 


Sharing this at:

Tuesday
Coastal Charm - Nifty Thrifty Tuesday
At Home With K - Terrific Under Ten Tuesday
My Uncommon Slice of Suburbia - Tuesday's Treasures
Sassy Sites - Trash 2 Treasure Tuesday

Wednesday
Someday Crafts - Whatever Goes Wednesday
The Thrifty Home - Penny Pinching Party
Savvy Southern Style - Wow Us Wednesdays

Thursday
The Brambleberry Cottage - Time Travel Thursday
The Shabby Creek Cottage - Transformation Thursday

Monday, March 19, 2012

Free Outdoor Decor

I love cool and trendy outdoor decor as much as the next person and will be sharing some of my prior purchases and finds in an upcoming post. However, yard and garden decor can get a bit pricey and too much of it can make your property go from classy to trashy (O.K. that's harsh but it rhymes!)

Try to go frugal and introduce some free "decor" to your yard. Old, rusty elements of some sort make unique, sculptural displays. They also tend to coordinate seamlessly with natural surroundings. See what items people are throwing away. You may be able to repurpose them.

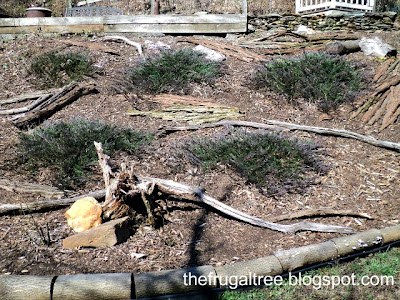
Shapely branches, limbs, tree roots and tree bark add a nice, organic touch to your landscaping. A grouping of rocks also adds interest and demands attention among any store bought elements you may elect to add. Creating vignettes outdoors isn't much different than indoors. You just have a bit more space to play with. Thoughtful groupings of elements will create a bigger impact than spacing things separately here and there. So, grab a neat branch or two, a few rocks and place them as a back drop or accompaniment to that mosaic snail or turtle sculpture.

Reclaimed Rusty Objects Become Outdoor Decor

Old rusty metal hoops (at right) along with a paint can make a unique statement.
Random sections of old stove pipe are grouped together (left).


The stove pipe collar collection.  Industrial-organic chic?

Numerous sized paint and coffee cans create a tower of rusty coolness.

A large barrel will later become a great base for a large potted plant or perhaps a bar height table.

A unified look of common elements.

Old hollowed and dried branches group nicely.  A repurposed stair rail post is topped with a
carved dragonfly from a craft show I attended numerous years ago.

A lot of free elements from trees are seen here.
Bark, branches, root and log sections  provide form and function.

Bark adds interest and helps keep mulch in place on steep landscaped areas.

An interesting, inverted tree root is joined by a couple of varying-style rocks to create this focal point.


Sharing this at:

Monday
Sumo's Sweet Stuff - Market Yourself Monday
Keeping It Simple - Motivate Me Monday

Tuesday
Coastal Charm - Nifty Thrifty Tuesday

Wednesday, March 14, 2012

Chippy Paint Rustic Shelf

As you may recall, my last adventure yielded some old, skid wood which I salvaged and turned into a rustic box. What I didn't tell you is that I also found some "authentic", chippy-paint, wood planks.   I left them there and returned a few days later to stake my claim!  After three treks back and forth through the woods, all the planks were home. What a fun work-out on a sunny and warm Spring-like day!

Here are "the goods" once I removed the numerous 3 1/2" nails and cut-off any bad end sections. At least some of the ends with nail holes were in good condition . . . (I love the vacant nail holes left in the wood for extra character.)


A bonus was that one of the planks had an old, loose (and rusted in place) latching hardware fixture. I knew I wanted to showcase that element on the completed piece.


The show-cased hardware on the finished shelf unit.

Well, here it is. Not too bad for a very "un-carpenterish" guy like myself  (" . . . Don't you remember you told me you loved me baby")


The front "apron" piece extends beyond the overall width (read more below).


Just some quick stats:

I cut (4) horizontal, shelf pieces at 3 feet and (4) vertical, side pieces at 4 feet. I created my horizontal shelves first by laying two of the 3 feet sections side by side (to add depth to the shelf) and connected or braced them together with scrap pieces of wood about 3 inches in from either end.

I did this similarly for all "sections" I created and then merely attached them together. Yes, I say merely as though it was breeze but this project took me a good four hours to do. (Pathetic, I know . . . and the carpenters on HGTV can case 8 windows, build a custom, built-in shelving unit and cut floor trim molding in a 1/2 hour show!  I'm so envious of their skills!!!)

OK, Back to attaching them. Where the sides attach to the top I used both "L" shaped brackets and corner blocks of wood. I screwed through the corner block into the top and into the sides. For the lower shelf, I again used blocks of wood which are simply screwed into the sides. These shelves simply rest on the blocks and are removable.

The wood plank with the hardware was used as an apron piece, spanning the front, top shelf. I elected to leave this one piece of wood longer than the overall width of the shelf as both ends had such great character I didn't want to lose with a clean saw-cut.  This extending piece also hides the other clean saw-cuts of the other pieces and where they connect.

Oh . . . and I added a "V" notch to the bottom of the side pieces with a jigsaw to create "legs".


Here it is staged at the front entry.

A simple mix of items with a bit of rustic charm.
Don't you just love that chippy, white paint?!

Old bottles I found while "good-deed" cleaning my road.

Old watering cans are just too cool!

A shabby lantern made from left-over. miscellaneous materials.


An iron doormat borrowed from my mother for one of my holiday displays.
Umm, maybe I can keep it awhile longer?  

The corner displaying my upcycled chimney pot with cool, twisty branches and filled with stones.

I sorta want to seal the shelf from the elements but don't want to change its appearance. Any suggestions on a good product to use? I have an oil-penetrating, clear-coat, deck sealer which I applied to the underside of one of the shelves but it made the wood darker.  I prefer the dry, weathered and faded look of the wood and don't want to lose that (too much). If I can't figure something out, this piece will be making its way indoors as a hallway console table. I really like it outside though. Thoughts?


Sharing this at:


Wednesday
Very Merry Vintage Style - Share the Love Wednesday
Restore Interiors - Restored It Wednesday
Primitive & Proper - Piece of Work Wednesday
Someday Crafts - Whatever Goes Wednesday
Savvy Southern Style - Wow Us Wednesday
Ginger Snap Crafts - Wow Me Wednesday


Thursday
The Brambleberry Cottage - Time Travel Thursday
The Shabby Creek Cottage - Transformation Thursday
Somewhat Simple - Strut Your Stuff Thursday
House of Hepworths - Hookin Up With HOH Thursdays


Friday
Happy Hour Projects - Freestyle Friday
Common Ground - Vintage Inspiration
At The Picket Fence - Inspiration Friday
The Shabby Nest - Frugal Friday
REDOUX - Friday Link Up Party
The Charm of Home - Home Sweet Home
Chic on a Shoestring Decorating - Flaunt it Friday

Saturday
Funky Junk Interiors - Sat Nite Special
Be Different, Act Normal - Show and Tell Saturday
Tatertots & Jello - Weekend Wrap Up Party

Related Posts Plugin for WordPress, Blogger...