Friday, January 6, 2012

Breaking Bottles


OH WHAT FUN! Who doesn't enjoy breaking things? WICKEDLY DELIGHTFUL, RIGHT? Actually, no I'm not much of a breaker of things and frankly, broken glass frightens me. Still, ever since I saw a vid on you-tube for cutting bottles I've been wanting to try it. Oddly enough, the idea is a hot one (ha, no pun intended . . . guess that is only funny to me at this point in the post, read on . . . ) I've been seeing crop up in home decor items.

Of course, the following process could get interesting if you do not already have empty wine bottles, so drink up and then play with your bottles the next morning! SAFETY FIRST!

Seeing as I always save empty bottles and cans for ideas, I had plenty on hand for this quick project.


You will need the following:

- A bottle (I used a large wine bottle at room temperature)
- Yarn (Cotton String)
- Acetone (fingernail polish remover)
- A candle lighter
- Gloves (if you dislike the smell of Acetone which I do)
- Safety glasses (just in case)
- A sink filled with cold water


1) Wrap yarn around the end of your bottle a good 6 or 7 times, tie it, cut of the excess yarn at the knot and slide it off the bottle.

Yarn wrapped around bottle.  Aluminum foil will catch any dripping acetone.

2) Use the inverted cap of the acetone as a small dish.  Push your yarn into the cap and pour a bit of acetone into the cap making sure you push the yarn down into it so it's fully saturated.

Yarn pressed into cap and soaked with acetone.

3) Slide the yard back into position on the bottle near the location you want it to separate.

4) Wipe any excess, dripping acetone off of the bottle with a paper towel, hold it over the sink by the neck and light the yarn with a long stem type candle lighter.

5) Slowly wind (rotate) the bottle so the fire burns evenly around the yarn and keep the bottle end slightly angled so the hot air remains trapped within the bottle.

6) After the fire extinguishes itself which took less than a minute, plunge the bottle into the cold water.  The cracking will scare ya a bit but the lower portion with the trapped air will break free from the upper portion of the bottle.

Bolla bottle broke nicely, the Woodbridge bottle has a visible crack (my first attempt).

7) Use caution to remove the bottom portion of the bottle from the sink and also use caution around the end of the bottle you are salvaging.  You may elect to use some fine grit sand paper to carefully buff the edges of the bottle at the break point.

8) Also use extreme caution if you decide to wash the interior of the bottle, again due to the bottom edge.  I recommend using a handled sponge to clean the interior and then rinsing in hot water and allowing the inside of the bottle to air dry.

9) Place the bottle over a lit tea light and enjoy your cool creation.

A large empty tuna can makes a great inverted base for this large size bottle.


Or use a flat rock such as slate for a more organic base.

If you watch the video, you will see that she used a smaller bottle which probably also had a thinner glass. Due to this, her bottles broke right on the string whereas mine seemed to break below the yarn line in both attempts. The first attempt broke a tad crooked and also created a few cracks around the bottom where I didn't want ANY cracks. The second attempt broke clean and produced no cracks on the bottle.

Use extreme caution.  I don't know how safe or unsafe this process really is. I tried it, I lived to tell about it, I didn't have any issues. Just use common sense and good judgement if you attempt it.


FYI: Flatter bottom bottles work best, those with concave bottoms are difficult to break.

I tried this bottle twice and it wouldn't break!

A 3" diameter candle pillar fits nicely within.
It is on a shallow candle holder with a rim on which the bottle sits.

Note: If you use your bottle over a candle, the top of the bottle will get rather hot. When you go to extinguish the candle, lift the bottle from its base, not the top.

Addendum:
After a bit more research on this, I found another video that suggests the use of an actual bottle cutter for cleaner results. I found this Generation Green (g2) Bottle Cutter at Amazon which I'm going to purchase and experiment with. Apparently, one simple score of the glass, combined with pouring hot water onto the score (teapot hot), followed by cold water and then hot again (continually alternating as long as necessary), will eventually cause the scored part to simply separate in a much safer fashion than the "burning bottle" approach. Seeing as I want super clean breaks and smooth edges, this is probably the better approach. I'll post more info once I get my bottle cutter to let you know how well it works.


Sharing this at:
The Crafty Nest - Do Something Crafty Friday
Happy Hour Projects - Freestyle Friday
The Shabby Nest - Frugal Friday
Laurie Anna's Vintage Home - Farmhouse Friday
Nifty Thrifty Things - Nifty Thrifty Sunday
Lamb Around's Blog Hop

Wednesday, January 4, 2012

New Year = "New" Finds

Out with the old, in with the new.  I guess it's that time of year.  Time for change.  For most, that adage pertains to habits, typically bad ones, that need to change.  In another respect it pertains to home items.  Out with the old, in with the new.  

If the holidays delievered good fortune, than many folks are making room for new items in their homes which means the old stuff hits the curb or better yet Good Will and other thrift stores

I happened to stop at our local mission yesterday located conveniently across the street from the post office where I was dropping off a few packages.  Hmmm, I guess it doesn't hurt to peek in and see if any new goodies have arrived.  I didn't stick around too long, but long enough to score a rather good find.


A great Ikea find, leaning so appropriately against my Ikea chair.
 A large 23" x 23" art piece from IKEA with a heavy, real wood frame and mat.  I couldn't pass it up.  The frame has a bit of scuffing along one edge but it will be a great little project.  I'm planning on sanding the wood and staining it with black wood stain and popping in one of own black and white pen and ink drawings. 


The "boogered up" spots that will need a little attention.


See how these little trips to the thrift stores become addictive?  You just never know what you are going to find.  This particular mission store has a barrel lid steamer trunk that I've been keeping my eye on too.   Do I have room for it?  "Ummm, No."  But it's so cool.

Anyway, be on the lookout for discards because you just may discover the "gem" of the day.  I guess that's a bit lofty for an IKEA picture frame.  We''ll say a GREAT BARGAIN FIND!  There, that's better.

Here's to "Happy Finding!"

Tuesday, January 3, 2012

Winter Squash?


No, your eyes are not deceiving you.  I took these pictures on January 3, 2012.  I keep seeing posts about people wondering how to decorate for Winter once they take down their holiday decor.  I say "decorate with pumpkins and gourds!"  Well, not really.  Why can't I part with these little guys?  They have been sitting quietly in their bowl in a somewhat hidden kitchen counter-top location, minding their business as the hub-bub of the holidays have come and gone.  Possibly feeling a little heartache and resentment toward the evergreen cuttings that have taken residence in their place for the past month.


So, a little experiment . . .


Well, it's a nice contrast but something just doesn't look right.  I guess our minds tell us that pumpkins and evergreen don't mix.  (I feel like I'm giving a public service announcement).  

So, what should I do with these buggers?  I can't throw them out just yet.  One gourd did dry out on its own which makes me want to dry the other ones out by some means.  I'll have to look into this.

In the meantime, a question.  When do you de-decorate for the holidays?  When do you undo all you did for Christmas?  My grandmother used to say that the tree and decorations stay up till the "Wise men reach Bethlehem".  I can't remember if that's a Tuesday or a Thursday. ;-)  (kidding)

As of now, everything is still up indoors and out and as you can see, even Autumn items are lingering.  What is socially responsible?  Perhaps I'll at least unplug the timer for the topiary lights outdoors.  "SIGH"  

Sunday, January 1, 2012

GO GREEN in 2012

Do you resolve to go green in 2012? Make your home a green home. Learn to conserve energy and use less water. Recycle products and repurpose old items as decorative solutions around your home. And of course introduce some GREEN into your color scheme this year through the use of wall paint or accents.  It's a soothing color that I can't live without.


Please visit the Frugal Interior Design Website to browse some of the featured "Green" topics

. . . and a HAPPY NEW YEAR to you!

Thursday, December 22, 2011

$0.25 Ornaments, Customized!

Well I guess it's nearing that time . . . holiday and seasonal clearance. As the "big day" approaches, steeper discounts seem to be popping up to rid and thin stock of holiday ornaments and decor. Oddly enough, I never seem to take part in these great deals as I typically am buying new holiday decor at the beginning of the season and am "decor'd out" by the end. Perhaps I'll try to be a bit more attentive this year if I head out after the holidays to do any shopping.

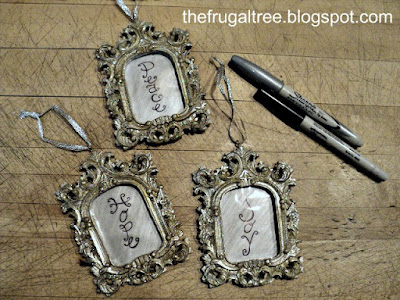
In the meantime, I found these great little picture frame ornaments for 25 cents a piece at the local Dollar General store. I knew I wanted to use them this year with the silver and crystal theme I have going on indoors.


Hmmm, what to place within the frames? Photos? Cut up holiday cards? I knew I wanted something displayed within that would equally match the color story in the room. I remembered I had a silver metallic sharpie marker. I took out the front display paper in the frame and flipped it over, using the back as the "new" display surface. I used the silver marker to draw straight, diagonal, overlapping lines to create the look of brushed aluminum or nickel. I grabbed one of my many fine-point, black Sharpie markers (I love these things and use them like crazy) and wrote out some holiday words that came to mind.

Should I hang them on the fireplace mantel or set them amid the mantel's decor? Perhaps hang them vertically down a small wall area? That vertical look must have stuck in my mind. I looked at the grapevine tree and its somewhat plain trunk and thought, there is my vertical surface. I thought I was done with this tree, guess not. Now I am . . . I THINK?


I love the new shimmer these little frames give to what was a rather dark area on the tree.  Are you still "fussing around" with your Holiday or Christmas trees too?

Sharing this at:
The Shabby Creek Cottage - Transformation Thursday
The Crafty Nest - Do Something Crafty

Sunday, December 18, 2011

Holiday Greeting Cards As Simple Decor

I've received a few holiday cards that perfectly fit the design aesthetic used this season throughout the home.  So, why not incorporate them more?  I know framing cards is nothing new but seeing as I have never done it before, I figured I would share how nicely they can become a decorative piece . . . a frugal decorative piece.

Whenever I see unique frames for cheap at thrift stores, yard sales, etc, I snatch them up.  They come in handy for spur-of-the-moment projects such as this.  If you need one in a jiffy, head to DollarTree.  You can easily modify one of their frames with spray-paint or other accessories to make it better suit your theme.

A holiday card speaks to the color story used in this room.
Added to an equally appropriate frame, it becomes a frugal decorative element.

I have a few more "perfect cards" that I can use in other rooms, so guess I'll be digging out some of my back-up frames for use or modification today.
Related Posts Plugin for WordPress, Blogger...